Saturday 22 January 2011

My Favourite Vegetable


One quiet morning, back in my Marry Poppins days, I was having breakfast with one of the little girls I was looking after. She took a big gulp of her milk, leaned over the table, and said to me intriguingly: “My dad has a saggy butt!” Now see, how do you reply to such a comment? I don’t mean reply; the word I’m looking for is recover. No one needs to know this kind of information, certainly not an innocent outsider such as myself.

What should be shared, on the other hand, is how a zucchini became a vital ingredient in the realm of chocolate muffins. I know what you are thinking. A zucchini/chocolate combo? Really? Really.  Listen, we are not talking just any kind of muffin here. This is a muffin so de-lovely that Cole Porter would have written a song about it had he ever tasted one.

I was bestowed one of these treasures, many, many, years ago, when I was having afternoon-tea with my Fairy God Mother. As always she had brought with her a variety of scrumptious treats. On my kitchen table was a small feast of raspberries, cinnamon swirls and a tray of truffles.  Then she pulled out a giant muffin from a brown bakery bag and declared: “This is your favourite vegetable!” I looked at her, then at the object in her hand, clearly not getting it. “It’s a chocolate-zucchini muffin!” she explained. Hmm, I reluctantly took a small, timid, bite, prepared to spit it out if needed. Before I knew it I had taken another bite, bigger this time, then another. Oh my, it was a taste sensation. The combination of the rich flavours and the heavenly texture was to die for. And had I done just that, died I mean, I would have insisted on bringing this muffin to the grave with me. Just in case it turns out that we can bring physical objects with us when crossing over the threshold to the after-life.  

I couldn’t believe it, the muffin didn't have the faintest hint of vegetable, and yet I knew a brave little zucchini was in there somehow. Why had this baking secret been kept from me? I felt left out, yet strangely happy to finally be introduced to the inner sanctum where the worlds of chocolate and vegetables seamlessly unite.

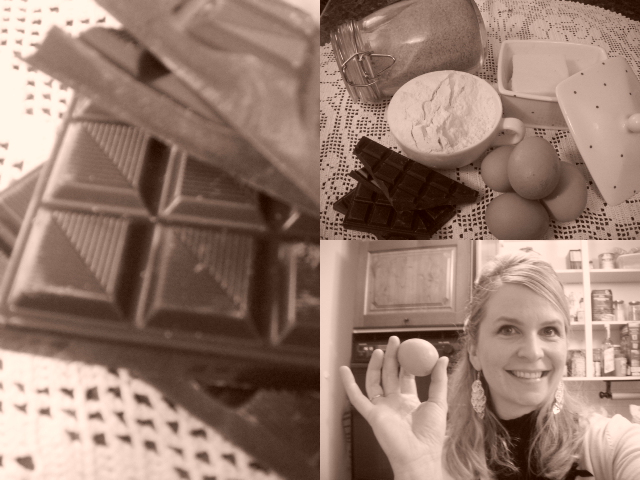
Ok, naturally the zucchini was not the only trick this muffin had up its sleeve. It was clearly made from-top quality cocoa, organic flour, and let’s not overlook the generous amount of x-large chocolate chips that adorned the top and created a crunchy seal. In addition, my newfound friend wasn’t overly sweet. Some wise baker had held back on the sugar ratio in order to let all the other flavours come forward. Did I detect a hint of vanilla?

Now, if you live in proximity to the Ashland Co-op, consider yourself lucky. There you can purchase this muffin every day of the week. Helpful hint: make sure to get there it in the morning when the baked goods are fresh out of the oven. 

If you and the Co-op are separated by an ocean or two, you have no choice but to make the muffins yourself. The following recipe is the one I have found to be the most true to the original master.

Just for the record, I’m not a big muffin fan. The ones you buy at the store or at coffee houses like Starbucks are too sweet, too boring and totally lacking in character. The ones you make yourself are often too though, some are sponge-like, some are not even worth eating. You are left to wonder how simple things like milk, flour, eggs and butter could end up so bad. This is why we only use top quality ingredients. Even if, for some strange reason, the finished result doesn’t come out the way we hoped, it will still taste delicious.  How cares if the muffins didn’t rise properly? Splash on some whipped cream and call it a day.

Chocolate-Zucchini Muffins
Best served on a quiet Sunday morning, 
with a big cup of tea or coffee.

2 eggs
125 g sugar
7 tablespoons melted butter
125 g milk
1 teaspoon vanilla extract
250 g flour
125 g cocoa
50 g finely chopped chocolate
1 zucchini, peeled and finely grated
1 teaspoon salt
1 tablespoon baking powder
1 tablespoon baking soda

1. Turn the oven on to 350 °F (or 177 °C) and grease your muffin tray with melted butter. (So you use some of the melted butter for the tray, some for the batter)

2. Whisk the eggs and sugar together until it starts to look pale yellow. Gradually add the rest of the melted butter and keep whisking.  Add milk and vanilla and whisk some more. Whisk, whisk, whisk, such a fun word.

3. In a separate bowl, whisk together flour, salt, baking soda and baking powder. Then add 2/3 of the chopped chocolate and salt. Whisk everything together until well combined. In this setting “well combined” is used to make sure that the baking soda and baking powder is evenly distributed throughout this dry mix. If not, some of you muffins will rise, some will remain flat, and a few will be stuck in the middle not knowing what to do.

4. Now, the ingredients of the hour, the zucchini. Take your grader in one hand, the newly peeled zucchini in the other, and grade away. If you have one of those 3 or 4 sided graders, use the fine side. If the zucchini is grated too coarsely, like a carrot, the pieces will bee too heavy for our delicate batter.
Take the grated pulp and toss it in with the flour mixture. Stir until evenly combined.

5. Now we are done with the whisking part. Let the folding begin. Make a well in the bowl with the dry ingredients and pour in the wet ingredients. Mix and fold gently, and slowly, with a rubber spatula. Do not overmix. I repeat, to not overmix. If you do, your muffins will become too though.  So keep your folding to a minimum, no more than 25-30 seconds.

6. Use a large spoon and divide the batter evenly among the greased muffin cups. My muffin tray holds 12 muffins, but your tray might hold 9 or 15 muffin cups. In any case, fill the cups with batter until ¾ full. If one or more cups are left empty, fill those with hot water. This will ensure that the muffins are evenly baked. Take the rest of the chopped chocolate and sprinkle on top before you put the tray in the oven.

7. Bake for 25-30 minutes. As always, the baking time depends on your oven. After 10 minutes, rotate the pan. When done baking, put the tray on a cooling rack and let it rest there for 5 minutes. Then gently remove the muffins from the cups and put them on the cooling rack. Muffins are easiest to remove when still quite warm, so don’t wait too long.  If they don’t just pop out, use a small knife and carefully lift them out of their cozy cups. 

It is widely believed that chocolate consumption releases a chemical into your body very similar to what is produced when you are in love. What are you waiting for?

Sunday 16 January 2011

How to make your friends happy without flour

We had decided to throw a surprise birthday party for one of our colleagues, a morning surprise party. You see, when I grew up I always got served birthday cake in bed. The idea of waiting a whole day for your cake was really too absurd. So we liasoned with her husband who agreed to have tea and coffee ready, we would bring flowers and cake. It was a simple plan, except for one minor detail. The birthday girl was allergic to flour, which meant I had to bake her a gluten-free cake. 

I started to look up some recipes, and they all required alien sounding ingredients like sorghum flour, tapioca starch and xanthan gum. This is not exactly staple food, where on earth would I find this stuff? To my great relief our local health food store carried everything I needed, and more. I discovered a whole world of gluten-free baking mixes and wheat substitutes. I guess we all want cake and bread, allergies or not.

I proudly arranged all the alternative wheat-substitute products on my kitchen counter and put on my apron (white nurse-apron that used to belong to my grandmother’s sister). I almost felt euphoric embarking on this new task ahead of me. Maybe I could open a gluten-free bakery? Everyone with allergies would “oh” and “ah” as they took their first bite of a wheat free strudel or a cookie made with rice flour.   

I followed this new recipe very carefully and put the cake in the oven. When the baking time was up, the cake looked totally normal. Success!  However, it felt alarmingly heavy and dense. Upon tasting all my bakery dreams died immediately. The cake not only had a led-like quality, it was tasteless and horrible. My taste-buds were rebelling. This was not a cake, this was pure punishment.

Never mind. I got on the computer in the search for a better recipe. Finally I found one that recommended putting apple sauce in the batter to make the cake more moist and tender. The cake looked pretty too, all delicious and inviting.  When my cake was done baking, it had an uneven beige colouring, it was dense, and with the added unattractive dip in the middle. By now I was getting a bit frustrated. I looked up further recipes, but it seamed like substituting wheat always were followed by “exclude sugar, egg and chocolate.” Instead I was encouraged to use tofu, honey and carob. No, no, no!. All I wanted was to make a chocolate cake that didn’t cause the birthday child to have an allergic reaction. I was not in search of a hearty hemp-cake dusted with bee-pollen.

Deflated I picked up my favorite cake recipe book. To my great delight, not to mention surprise, I discovered more than one flourless chocolate cake. That’s right, f l o u r l e s s cakes, not cakes made with flour substitute. I gave one of the recipes a try, and this time the cake turned out beautifully. This was a decadent, rich, almost mousse-like cake, worthy of both making and eating. I has finally found my perfect wheat free cake.    

I do remain open to the idea that I one day will come across a fabulous chocolate cake made with sorghum or rice flour, but in the meantime I’ll stick to the flourless options.

Gina, this one is for you.

 Chocolate Marquise Cake

300 gram chocolate-cut into bits
3 tablespoons cocoa powder
115g butter-cut into small pieces
4 large eggs, separated
1/8 cream of tartar
2 tablespoon sugar

This cake is really easy to make, but you need a standing mixer and a bottomless cake form. You must also know how to fold egg whites. If you don’t, take a quick look at this link: http://www.youtube.com/watch?v=ncSTNoU4nn4 . Unfortunately there is a consistent, weird, breathing sound in the background, but at leas it shows you the art of folding.  

1. Line the bottom of a 9 inch cake pan with parchment baker. Melt 30g of chocolate over very low heat. Then scrape the chocolate on to the bottom of the cake pan and spread it thin and evenly. (This little trick will prevent the cake from sticking to the paper). Put the pan in the refrigerator.

2. Melt butter and chocolate together over very low heat, stir from time to time. When melted and smooth, whisk in the egg yolks. Remove from heat and set aside.

3. Put the egg whites and cream of tartar in a mixing bowl and beat at medium speed until soft peaks start to form. I know, cream of tartar is a really weird name. It even has its own formula: KC4H5O6 . This Russian sounding powder helps stabilize the egg-whites and increases their heat tolerance and volume. \Just what we want! When our peaks start to appear (with the help of Mr. Tartar) gradually sprinkle in sugar and increase the beating speed to high. Beat until the egg whites are stiff, but not dry. Dry whites will curdle, stiff whites look smooth.

4. Gently stir one fourth of egg whites into chocolate mixture to lighten it. Then scrape the remaining egg whites on top of the chocolate mixture and fold together until completely incorporated. The reason why we fold, and not stir or whisk, is to preserve the volume of the egg whites. Volume equals tall cake. Scrape this heavenly mixture into the prepared pan and refrigerate the cake. It can be prepared up to 2 days in advance, but can be served after only 4 hours.  

5. When ready to be served,  remove cake from fridge and dust the top with the cocoa powder through a fine strainer. A tea strainer is a brilliant tool for this purpose. Then heat the sides of the form with a hot, wet towel. This makes it easy to slip off the form without making a mess. Once the side is off, turn the cake upside down on a serving plate and remove the bottom of the pan and peel off the paper. Serve cold, perhaps with some fresh fruit or berries on the side.

Afterword: You will discover that the un-molding part of the process might require some patience, so don't rush it.  In general, never be in a hurry when you bake. Put on some good music, sip your favourite tea and fully enjoy your baking experience. And remember, there's nothing better than a good friend, except a good friend with chocolate.  


Saturday 8 January 2011

Le Perfect Brownie


I discovered brownies in Beijing of all places. After days of being served pig ears, ox penis and duck-feet soup, we stumbled upon a newly opened Hard Rock Café. This was back in the early 90s when you could stay at a hotel for £3 a night and Roger Moore was the voice for the audio tour of the Forbidden City. I loved Beijing, the smells, the people, being new to everything, but I wasn’t going to turn down a coke and some fries. Then dessert arrived. A big, tall, glorious piece of brownie adorned with whipped cream and a cherry on top. Since then I tried numerous brownie recipes, but they all came out too crumbly, too dry, too cake-like. And we all know that brownies are supposed to be chewy, soft and gooey. So how would one achieve such a thing? In my search I discovered 3 crucial factors.

1.  Use only brown sugar. Why? Because dark, or brown, sugar holds on to moisture in a way that white sugar can only dream of..

2. Always use good quality chocolate. That doesn’t mean you need to do your chocolate shopping in Belgravia, just don’t buy the cheapest one you can find. You see, poor quality chocolate doesn’t melt very well. When heated up it turns into some mud-like substance, and what we are after is something more in the realm of velvet.

3. Don’t leave your brownies in the oven for too long. You might think it needs more time to bake, but it doesn’t. When testing your brownie batch with a toothpick, it should come out sticky with soft crumbles. All cakes continue to bake for a while once out of the oven, and it’s the same for brownies.

The recipe I’m about to share with you will be your friend and ally for life.

Le perfect brownie:

11/4 cup flour
¾ teaspoon baking powder
½ teaspoon salt
160 g butter
170 g chopped up chocolate
2 ¼ cups soft brown sugar
4 eggs
1 tablespoon vanilla

Turn the oven on to 325 °F (or 162.78 °C)

Cut the butter in small pieces and melt in a pot over very low heat. Once melted, add the chocolate. Stir it until its all blended together, then turn the heat off. If your pot is big enough, you can now add the sugar to the pot. If not, pour the chocolate/butter mixture into a large baking bowl and then add the sugar. Stir until it’s mixed together and leave it to cool down to room temperature. In the meantime, break the eggs in to a bowl and whisk together with a fork. Add vanilla and whisk some more. Pour this in to the cooled chocolate concoction and stir until it’s blended together. There is no need for an electric mixer, your hands and a wooden mixing spoon will do
In a separate bowl, combine flour, baking powder and salt.  Add one third of this dry mixture to the wet batter and stir well. Continue to add the dry mix and stir until it’s all nice and blended.   

Line a 12”x 8” (or 30cm x 20cm) baking pan with parchment paper. If you make a small insert in all the four corners of the paper, and overlap the loose ends, the corners will be nice and sharp in the pan. I like sharp corners, and yes, I’m an expert at hospital corners as well.

Pour the lovely batter into the pan, savour the smell, and put the pan in the oven. Set your timer for 15 minutes. After 15 minutes turn the pan around, ensures even baking, and set the timer for another 10 minutes.  Get a toothpick and insert it in the middle of the brownie. How does it come out? If it is covered in moist crumbles, the baking time is up. If it comes out too runny, leave it in for another 5 minutes. It all depends on the oven, how deep your pan is, and so on. Mine normally takes 20 minutes, but with my previous oven it was 30 minutes.

Once out of the oven, let it cool for a bit, then cut them up in however small or big pieces you want. Serve on its own, or with ice-cream, whipping cream, sprinkled with powdered sugar, the options are endless.  I like to sprinkle my brownies with chopped up walnuts or chocolate before it goes in the oven. Mmmmmm.

Best of luck, and enjoy your brownies.