Frosting is tricky, or it can be. Burnt chocolate, grainy texture, overpowering butter flavour, not enough to cover the top and the side of the cake, the whole experience can leave you quite deflated. You might get the frosting right, but your cake could still end up lap-sided and unsightly. Is it any wonder that so many people simply buy cakes and leave the baking to the professionals? How many times have I butchered a layer-cake by cutting the layers uneven, messing up the serving platter with dripping frosting and fingerprints, and utterly failing to smooth out the top coat of the cake? Endless times I tell you, endless. But I never gave up. I always knew it was possible to create an inviting, tall, proud and perfect layer-cake. Yet all the recipes I tried always left out those helpful hints that would make this dream a reality. I guess the census is that if you are brave enough to try a recipe that requires more than your average cooking skills, you already know everything there is to know. No point being helpful or anything, just leave the baker guessing and frustrated.
The thing is, it's not that difficult. After all, we are not entering a small town baking contest or trying out for a French pastry school (even though I would love to!) I simply want to bake a cake that doesn’t look like it belongs in the stage production of Rent.
Of course, most people are thrilled beyond recognition whenever they are served anything home made, (you made that from scratch???), but don’t let this kind of admiration and enthusiasm slow you down. Aim higher, raise the bar, you can bake a cake and decorate it too. But before we get started, read and treasure the following tricks I’ve picked up along the way.
Baking pan: Guess what? It turns out that the pan measurements they recommend in the recipes does matter. And here is why: If your baking pan is too big, the cake will not get as tall, and it can easily over-cook. A dry, thin, layer cake is just not worth it. And if the pan is too small, well, then the batter will overflow. So measure your pan.
Cutting the cake into layers: This part was always my downfall. How to cut the cake without reducing it to a ground zero zone with crumbs and uneven layers all over the kitchen counter? I tried a longer and sharper knife. I tried making a small insert along the side of the cake so I would know where to match up the layers again. I tried eyeballing it, good luck with my eye sight. The truth is, I was not getting anywhere. Sometimes I would get it right, sometimes not, there was just no telling. I needed an airtight technique, something I could always trust.
Then one day I read about the ruler, and the power of patience. You take an ordinary ruler and carefully make little marks all around the cake, 1” or 2” high or however thick you want the layers to be. Then when you get ready to cut the cake, you will without a shadow of a doubt cut the layers 100% even, just follow the marks. What used to be the hair-pulling experience is now a faultless Zen moment. So easy, so simple, so brilliant.
Another advice, be realistic. If the recipe says to cut the cake into three layers, but your cake didn’t rise that much, be happy with only two. Sliver thin layers only fall apart anyways.
Frosting tools: A frosting knife and an icing bag, go out and get them. With one big swoosh the frosting knife will spread the frosting perfectly even and smooth. No spatula or regular knife could ever measure up. The icing bag, the fantastic icing bag will become your best friend. Do you want to make rosettes along the edge of the cake, draw an art deco pattern in the middle, or how about a nice border along the side? Try doing that with a spoon or some other medieval tool. Equipped with a frosting bag there are is no end to how pretty and professional your cake will look. It’s all about those finishing touches.
So what is the point of all of this? The point is to make you see that making a great cake, a layer-cake, is not only easy, it’s great fun. Once you get the hang of it nothing can stop you. You will find yourself making all kinds of patterns, experimenting with different frosting techniques, whipping up cakes and decorating them in no time.
Life is too short to eat tasteless (store bought), unattractive (home made with no skills), cakes, so get baking.
The recipe I have in mind today is from my dearest grandmother. She only makes it for birthdays or very special occasions. If I see this cake on the dessert table, I know its a particular important day. The cake is not very fancy, it doesn’t require any mystical ingredients or delicate equipment, but it is your classic, rich, timeless chocolate layer-cake.
Grandma Inger’s Chocolate Cake
6 eggs
200g sugar Frosting
125g chocolate 120g butter
3 tablespoon butter 200g chocolate
120g flour 400g icing sugar
1 tablespoon cocoa A pinch of salt
Preheat the oven to 175ºC and line a 12” round baking pan with non-stick baking paper. Don’t worry about greasing or lining the side of the pan. You actually want the cake to stick to the side. This will prevent your cake from falling down after rising. My mother thought me that.
Beat eggs and sugar with an electric mixer on high speed until it has at least tripled in size, and the colour has transformed from pale yellow to almost white. This could take a while, so in the meantime melt chocolate and butter over low heat. While that is slowly melting, whisk together flour, cocoa and baking powder.
After the chocolate mixture has cooled down to room temperature, alternate between adding this mixture and the flour mixture to the foamy egg batch. Stir in between, it must all be evenly blended.
Lovely, now pour your batter into the cake pan and bake for 45 minutes. As always, rotate the pan after 20 minutes, and check if its done after 30. Just insert a needle, or something similar, in the middle of the cake and see how it comes out. If its covered in drippy batter, the cake clearly needs to remain in the oven. If the needle is coated with moist crumbs, remove the cake from the oven and place it on a cooling rack. Leave it there for 10-15 minutes. Then take a small, sharp, knife and run it along the sides of the pan to release the cake. Turn the cake up side down, either by letting it rest in your hand or on a platter, and remove the bottom of the pan along with the baking paper. Put the cake back on the cooling rack and let it cool down for another 30 minutes or so.
I always like to make the frosting while the cake is baking. Then the frosting has time to set and cool down for when the cake is ready.
Melt chocolate and butter over low heat. When melted, add eggs and alt and stir until its all incorporated and blended. Add the icing sugar, a little at a time. Whisk carefully until your frosting is smooth and shiny. (If for some reason you frosting is more dull than shiny, you can always add a tiny bit of milk or whipping cream. Another helpful hint they don’t tell you in the recipe books.)
Here is a confession. I always have a bit of extra chocolate or some whipping cream on hand when making this kind of cake. Why? Because I know there is a real chance of running out of frosting. In order to stretch my batch, I can melt more chocolate or whip up some cream and mix it in with the left-over frosting. Either way, the result is often that it looks like I’ve made 2 or 3 different frostings, quite impressive. There is a dark frosting for the layers, then a lighter frosting for the outside of the cake. The trick is always to make your mistakes look intentional. I learned that when sewing, but it also applies to baking.
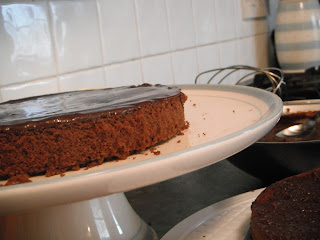
Now, get out your ruler and make small, but visible, marks all around your cake. If you are cutting it in 3 layers, you can make marks for both cuts at the same time. Cut your cake by following the marks, and put your layers carefully down on separate plates. First you put a blob of frosting on the bottom layer of the cake. With your icing knife spread the frosting evenly. If your frosting isn’t even, the cake will end up uneven, so it’s important to get this right from the beginning. Then you take the second layer of the cake and place it on top of the frosting. Spread frosting on this layer as well. At last, place the top of the cake on that layer of frosting, and now we move on to the decorating part.

To coat the top, place a blob of frosting in the middle of the cake and spread it (with your frosting knife of course) out to the edges. You might spill some over the edge, let it be. Then spread a thing layer of frosting all around the side of the cake. Put the cake in the fridge for 10 minutes. Once the frosting is set it will be easier to add the second coat, and it will also prevent crumbs from getting into the mix. Apply the second coat of frosting to top and side. Like before, coat the top first, then the side. Take your time, no point in rushing it. As you will notice, a ridge will form along the edge where the top and the side meet. Hold the icing knife at an angle and smooth the ridge towards the centre. Easy does it. Rotate the cake and repeat until the ridge is gone.
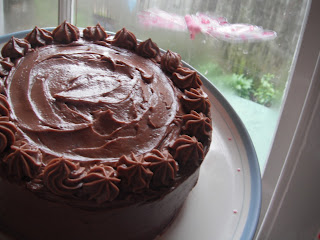
Put the remainder for the frosting in an icing bag (with the star nozzle in place), and make little flowers along the edge of the cake. You might want to practice on a plate first.
See! That wasn’t so hard! It just takes time, but its not difficult. Who’s the Domestic Goddess now?


